Adding Parse Push Notifications to Existing Android Project
I recently had the joy of implementing Parse Push notifications into my final year project for university.
I was beginning to lose all hope after trying to follow the Android tutorials on Parse, the Android Tutorial they have on GitHub, following their Push Notification Guide (which is a feat in itself) and attempting to follow some guides written by fellow users.
After many hours, I finally came up with a solution that worked for me.
Below is a quick guide to success!!
* I am using Eclipse IDE
** I got this to work using Parse-1.4.1 SDK
Pre-Requisites
Parse Dashboard
AndroidManifest.xml
<uses-permission android:name="android.permission.INTERNET" />
<uses-permission android:name="android.permission.ACCESS_NETWORK_STATE" />
<uses-permission android:name="android.permission.VIBRATE" />
<uses-permission android:name="android.permission.WAKE_LOCK" />
<uses-permission android:name="android.permission.GET_ACCOUNTS" />
<uses-permission android:name="android.permission.RECEIVE_BOOT_COMPLETED" />
<uses-permission android:name="com.google.android.c2dm.permission.RECEIVE" />
<permission
android:name="<YOUR-PACKAGE-NAME>.permission.C2D_MESSAGE"
android:protectionLevel="signature" />
<uses-permission android:name="<YOUR-PACKAGE-NAME>.permission.C2D_MESSAGE" />
<application>
<!-- THIS IS FOR PARSE PUSH NOTIFICATIONS -->
<service android:name="com.parse.PushService" />
<receiver android:name="com.parse.ParseBroadcastReceiver" >
<intent-filter>
<action android:name="android.intent.action.BOOT_COMPLETED" />
<action android:name="android.intent.action.USER_PRESENT" />
</intent-filter>
</receiver>
<receiver
android:name="com.parse.GcmBroadcastReceiver"
android:permission="com.google.android.c2dm.permission.SEND" >
<intent-filter>
<action android:name="com.google.android.c2dm.intent.RECEIVE" />
<action android:name="com.google.android.c2dm.intent.REGISTRATION" />
<category android:name="<YOUR-PACKAGE-NAME>" />
</intent-filter>
</receiver>
<!-- END -->
</application>
Android Activity
Parse.initialize(this, "APPLICATION_ID","CLIENT_KEY");
/* The MainActivity.class is the default activity to handle push notifications. This is where the user will be redirect to once they click on the notification they just received */
PushService.setDefaultPushCallback(this, MainActivity.class);
/* This will save details about the current device to the Class we create earlier in the Parse Dashboard - Registers a device with Parse so that push notifications can be sent to it */
ParseInstallation.getCurrentInstallation().saveInBackground();
Sending a Push Notification
** I got this to work using Parse-1.4.1 SDK
- Pre-Requisites
- Parse Dashboard
- The AndroidManifest.xml
- Android Activity
- Sending a Push Notification
- Troubleshooting
Pre-Requisites
- Ensure the Parse SDK has been imported to your Android Application Project (libs > Parse-1.4.1)
- Check your BuildPath (right-click on the project folder > Build Path > Configure Build Path...). Under the 'Libraries' tab enusre that Parse-1.4.1.jar is imported. If it is not, click 'Add JARs' and select it from your 'libs' folder. Under 'Order and Export' tab, ensure Parse-1.4.1.jar is checked.
- You should have a Parse user account with a 'app' created. (This can be a blank app or one that you have been using.
- You should have a note of your ApplicationId and ClientKey. (If you don't have these, you can find them under: Settings > Application Keys (from your app dashboard.)
Parse Dashboard
- Sign-in to Parse and go to the Dashboard for you Application.
- Click on 'Data Browser'
- Add a new class to your Application. Click on 'New Class' and choose 'Installation' from the drop down menu. Click 'Create Class'. This Installation class will hold information about the devices that access/register with your application.
- Click on 'Settings' and from the left-hand menu choose 'Push Notifications' turn ON 'Client Push Enabled' if it is not already enabled.
AndroidManifest.xml
- Ensure you have the following lines of code in your AndroidManifest.xml. Before the <application> tag.
<uses-permission android:name="android.permission.INTERNET" />
<uses-permission android:name="android.permission.ACCESS_NETWORK_STATE" />
<uses-permission android:name="android.permission.VIBRATE" />
<uses-permission android:name="android.permission.WAKE_LOCK" />
<uses-permission android:name="android.permission.GET_ACCOUNTS" />
<uses-permission android:name="android.permission.RECEIVE_BOOT_COMPLETED" />
<uses-permission android:name="com.google.android.c2dm.permission.RECEIVE" />
<permission
android:name="<YOUR-PACKAGE-NAME>.permission.C2D_MESSAGE"
android:protectionLevel="signature" />
<uses-permission android:name="<YOUR-PACKAGE-NAME>.permission.C2D_MESSAGE" />
<application>
- Replace <YOUR-PACKAGE-NAME> with the name of your project package (i.e. com.example.project.permission.C2D_MESSAGE
- Add the following code directly before the closing application tag </application>
<!-- THIS IS FOR PARSE PUSH NOTIFICATIONS -->
<service android:name="com.parse.PushService" />
<receiver android:name="com.parse.ParseBroadcastReceiver" >
<intent-filter>
<action android:name="android.intent.action.BOOT_COMPLETED" />
<action android:name="android.intent.action.USER_PRESENT" />
</intent-filter>
</receiver>
<receiver
android:name="com.parse.GcmBroadcastReceiver"
android:permission="com.google.android.c2dm.permission.SEND" >
<intent-filter>
<action android:name="com.google.android.c2dm.intent.RECEIVE" />
<action android:name="com.google.android.c2dm.intent.REGISTRATION" />
<category android:name="<YOUR-PACKAGE-NAME>" />
</intent-filter>
</receiver>
<!-- END -->
</application>
- Replace <YOUR-PACKAGE-NAME> with the name of your project package (i.e. "com.example.project"
Android Activity
- Add the following lines of code to your Android Activity (ie. MainActivity.java) in the onCreate() method.
Parse.initialize(this, "APPLICATION_ID","CLIENT_KEY");
/* The MainActivity.class is the default activity to handle push notifications. This is where the user will be redirect to once they click on the notification they just received */
PushService.setDefaultPushCallback(this, MainActivity.class);
/* This will save details about the current device to the Class we create earlier in the Parse Dashboard - Registers a device with Parse so that push notifications can be sent to it */
ParseInstallation.getCurrentInstallation().saveInBackground();
Sending a Push Notification
- Run the application to register your device with Parse.
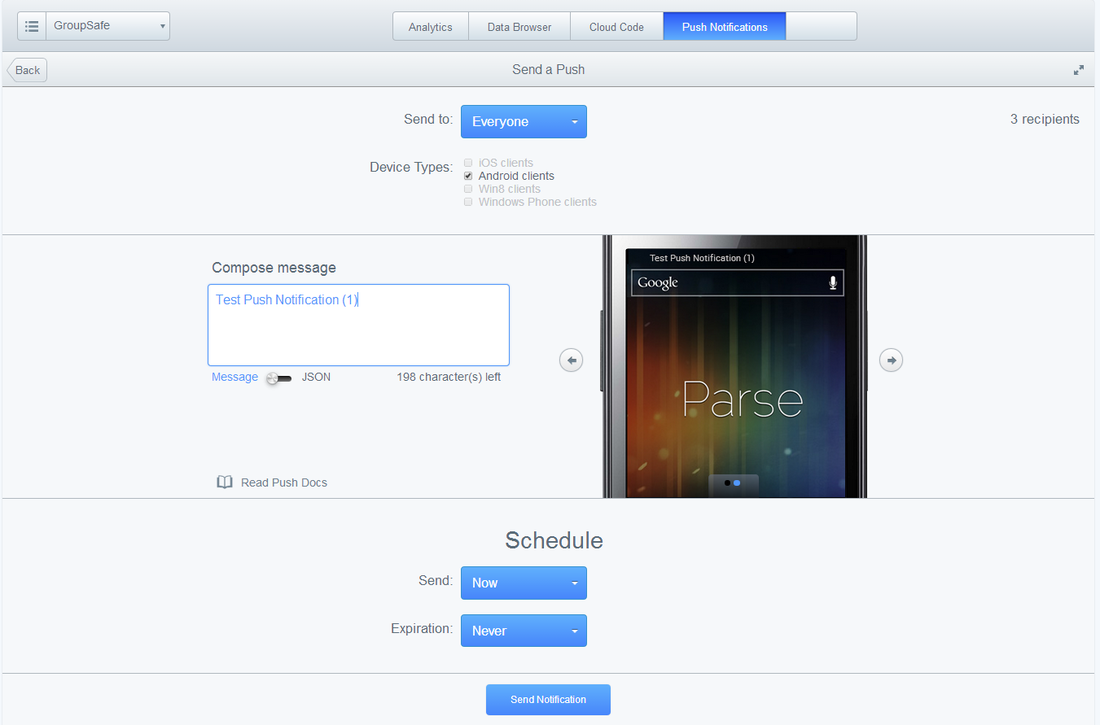
- From the Parse Dashboard select 'Push Notifications'. Click on '+ Send a push'.
- In the top right corner your will see the 'Recipents' (I have 3.) If you see '0' your device hasn't successfully registered. Ensure the 'ParseInstallation' line is being reached and that you can see at least 1 entry in the Installation class from the 'Data Browser' on your Parse Dashboard.
- Select 'Everyone'
- Type in a message in the 'Compose Message' Box
- Click 'Send Notification'.
- You should see the notification arrive on your device.
Troubleshooting
Parse.initialize(this, "APPLICATION_ID","CLIENT_KEY");
PushService.setDefaultPushCallback(this, MainActivity.class);
ParseInstallation.getCurrentInstallation().saveInBackground();
*** I found that because I had split my project up into seperate packages (ie. com.example.main, com.example.utilites, com.example.adapters) it wouldn't work.
- Ensure you have the Parse SDK in your project, and that the Parse-X.X.X.jar is on the build path.
- Check that you are using the correct Application ID and Client Key for your application (Parse Dashboard > Settings)
- Check that you have Client Push Enabled for your Application (Parse Dashboard > Settings)
- Check that you have an Installation Class for your project set up in the Parse Dashboard - and that entries are being successfully saved to it.
- Ensure your AndroidManifest.xml contains all the correct permissions and that you have replaced your package name correctly.***
- Ensure you have these lines n the onCreate() method in your Android Activity:
Parse.initialize(this, "APPLICATION_ID","CLIENT_KEY");
PushService.setDefaultPushCallback(this, MainActivity.class);
ParseInstallation.getCurrentInstallation().saveInBackground();
*** I found that because I had split my project up into seperate packages (ie. com.example.main, com.example.utilites, com.example.adapters) it wouldn't work.
Interesting Further Reading
Parse have recently added support for Google Cloud Messaging (GCM) to receive push notifications. Read more about it here.
Parse have recently added support for Google Cloud Messaging (GCM) to receive push notifications. Read more about it here.
 RSS Feed